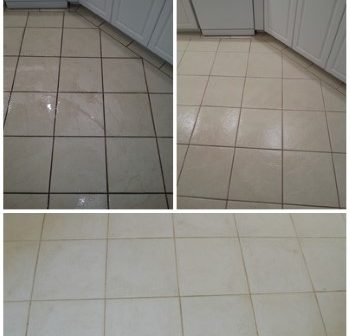
Understanding how it all works!
99% of soiling consists of oils, fats and grease!
Most people try to clean their grout using bleach, when they should be using detergents. Bleach will permanently damage your grout – so don’t be tempted to do this.
Detergents are designed to break down oils, fats and grease. The best one in your home is a non-bleaching laundry powder or laundry liquid.
Not only will it make the task easier to do, it will last much longer and not damage the grout! Simply follow the instructions below.
Shopping list: 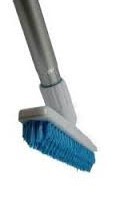
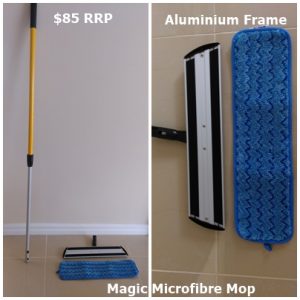
- A good commercial grade Micro-fibre mop. We recommend the “Rubbermaid Hygen” – can be purchased from us at $85 inc. GST. Replacement mop cloths available.
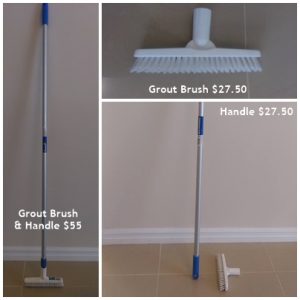
- An inline grout brush. Can be purchased from us at $55 inc. GST. Replacement brushes available.
- White vinegar
- Non Bleaching Laundry Detergent (liquid or powder)
- Bucket and a 2 litre spray bottle
- An old bath towel or two.
10 Easy Steps to get your tiles incredibly clean!
- Brush or vacuum floor throughout
- Mix up ½ cup of washing powder/liquid to 2 litres of warm water in bucket
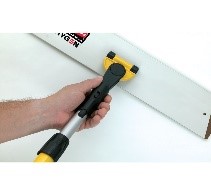
- Spread about ½ cup evenly onto the tiled floor, then use the inline grout brush to work into the grout lines.
- Repeat this over an area of 3 or 4 metres, brushing/agitating the surface as you go.
Caution!
At this stage the tile surface will be very slippery so be very careful, no children or pets around to distract you or to slip (including yourself)!
- You will notice that the water has changed colour to a yucky brown. That’s because the chemical you are using has broken down the grease, fats and oils and the soiling is now suspended in liquid form. You now need to use your old towels.
- Simply absorb as much of the slurry as you can, repeating this throughout the area you are cleaning until mainly dry.
- Now mix up ½ cup white vinegar with warm water to fill the 2 litre spray bottle. Set the nozzle to coarse spray
- Take the microfibre mop and liberally wet the mop head with the vinegar /water mix. Then do the same to the area you have just cleaned.
- Use the mop to spread it around and work into grout lines. Dry with clean old towel.
- Give your mop a really good rinse under warm running water until it runs clear. Finish off the floor with this and allow the floor to completely dry.
Note
All chemicals need to be neutralised so that they do not form a sticky residue and become part of the problem, so that is why you we recommend using white vinegar. Vinegar is a 3.5PH so will easily neutralise your washing detergent, plus it will help to brighten up the grout lines without damage.
Allow your floor to dry and if you notice any haze or streaking on your tiles it means you have not rinsed off all the chemicals, so just repeat with the water and vinegar.
Good Luck from the Cleaning Guru!
BLOGGER: Paul Mitchell, Owner/Operator of Alpine Carpet & Tile Cleaning, Perth.

Disclaimer: Please note that this and any other tips given in our DIY blog is to assist you in minimizing any discoloration or staining damage. Please follow instructions and measurements carefully as use of different quantities may have unintended consequences. These tips do not take in account individual circumstances, and we cannot be held responsible for any claim or action that may arise from using the information on this website. Please note that in some cases, there are different treatments for different fibres/fabrics – i.e. natural or synthetic. These tips are not a substitute for the treatment that we would offer as a professional carpet cleaner. If in doubt, please call us immediately.